HTML (HyperText Markup Language) is the language of the web. Markup language means that you can annotate content (say, tag a particular word with a particular style or meaning). HTML webpages are basically annotated content that can be read by web browsers.
Some helpful terminology:
- tag
- attribute
- element
Getting Started
We are going to be writing code (html) that makes things appear on the web. The first step is to create a folder that will hold your new website.
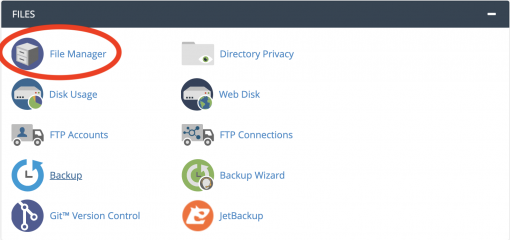
Navigate to your Catapult account, and scroll down until you see files. Click on File Manager.
In the left-hand sidebar, look for a folder called public_html. Double click on it.
In the upper left-hand quarter, click the + Folder icon. Name the folder dcs106_w2020. Click create new folder.
Double-click on the folder you just created. Go back to the upper left-hand corner and click the + File icon. Name your new file index.html.
Select index.html, and click the HTML editor button. When prompted, click edit. You will see what looks like a text edit box. Locate the source button, and click it.

The file that you are working with will live at [whatever your domain is]/dcs106_w2020/index.html. For example, mine lives at http://shroutdocs.org/dcs106_w2020/index.html
Writing code
You should see code that looks like this:
<html>
<head>
	<title></title>
</head>
<body></body>
</html>
Here’s what the code means:
<html>
</html>
These are document declarations. They tell the browser how to read the file. In this case, they say that this is HTML.
<head>
</head>
These signify a header section. Think of this as the title to your website.
<title>
</title>
These let you add a title to your website. This means the text that appears in the tab of your browser. Add some text between the title tags. Save your file. Load your website. What happens?
<body></body>
These tags signify the body – the stuff – of your website. You can add text, images, colors, anything!
Start by adding section division tags to your body section. Your code should look like this:
<body>
<div>
</div>
</body>
Inside the div tags, add a heading tag. h1 means the biggest heading, h4 means the smallest. Put a title (like About Me) inside the heading tags. For example:
<body>
<div>
<h1>About Me!</h1>
</div>
</body>
Look at your website again. What has changed?
Now, add a regular text section. Under the heading tags, add paragraph tags. For example:
<body>
<div>
<h1>About Me!</h1>
<p></p>
</div>
</body>
In between the paragraph tags, write a paragraph about yourself. Think about this as a formal introduction to the website you’re going to build for the class. It should be as formal or as informal as you want.
If you want to add a new paragraph, use another set of paragraph tags.
Adding More
We’ll be spending some more time styling our websites, but you should start by adding a hyperlink, an image, and some formatting.
Check out Dr. Miriam Posner’s tutorial on HTML websites (read only the Add a Header, How links work, Create a link on your page, How images work, Add an image and Add some emphasis sections.